Quick-Start: Maps: Difference between revisions
m (→Passability) |
No edit summary |
||
| Line 155: | Line 155: | ||
[[Image:chapter04_10.png|frame|center]] | [[Image:chapter04_10.png|frame|center]] | ||
To the right of your canvas | To the right of your canvas you can see your undo/redo history. It shows the last 6 operations you preformed on the tile, and allows you to revert to any of them. You can either click them directly or use CTRL + Z to undo. You can use CTRL + Y to redo. | ||
Be careful! If you make any changes to a tile, you will not be able to redo an action. | |||
Similarly, if you leave the editor, you will lose your undo/redo history. | |||
=Passability= | =Passability= | ||
Revision as of 09:37, 24 May 2017
By the End of This Section you Should...
- be able to edit maptiles and maptile sets
- add default passability to certain tiles
NOTE: Merge these screenshots
Maptiles
To edit your maptiles, fire up Custom and navigate to "Edit Graphics".
You might notice that at the bottom there's an option to Import/Export Maptile sets.
It is indeed possible to work with your art in an external program and then import said art into the OHR, but that's for a later segment.
After getting to the Edit Graphics menu, you should see a bunch of options before you.
For now, go to "Edit Maptiles"
The next screen should only have "Tile Set 0" showing up if this is a brand new project.
Select "Tile Set 0" to proceed to the next screen.
You will now be at the screen from where you can control all the different things about your tileset. They are:
- Draw Tiles - Lets you create and edit tiles. You can also use copy, paste, and transparent paste.
- Cut Tiles from Tilesets - Lets you copy tiles between tilesets
- Cut Tiles from Backdrops - Lets you create tiles from a backdrop
- Set Default Passability - Lets you set whether a tile acts as a wall in any direction
- Define Tile Animation - Lets you set whether a tile is animated
- Background color - Lets you change the background colour. This has no in-game effect, and is intended to help you if you need to see what you are doing.
We'll get to all of the rest eventually, but for now, select "Draw Tiles" so we can get to making some tiles.
These are the controls for editing graphics:
Use mouse or arrow keys to select a tile or frame. Click or press enter whilst over it to begin editing it. You can use the current tool with primary click or SPACEBAR. You can move the cursor with mouse or arrow keys. Secondary click or ENTER sets the current colour to whatever colour is under the cursor.
You can select the current tool by clicking its corresponding icon, or pressing the corresponding shortcut key.
You can use shortcut keys to switch between tools quickly.
- 'D' - Draw tool. Allows freehand drawing.
- 'B' - Box tool. Draws square or rectangle shapes.
- 'L' - Line tool. Draws straight lines.
- 'F' - Fill tool. Changes all adjacent pixels of the same colour as that under the tool to the currently selected colour in the palette.
- 'R' - Replace tool. Changes all pixels of the same colour as that under the tool to the currently selected colour in the palette.
- 'O' - Oval tool. Draws circles and ovals.
- 'A' - Airbrush tool. Sprays pixels semi-randomly. It has settings you can change by clicking on the buttons that appear, or using '+' and *'-' to change the area and CTRL + '+' and CTRL + '-' to change the density of the spray (mist)
- 'S' - Scroll tool. Allows you to move the canvas in any direction. For maptiles, this causes the canvas to wrap to the opposite side. For other graphics, this causes a loss of data.
- 'M' - Mark tool. Lets you select an area for cloning.
- 'C' - Clone tool.
- '[' and ']' contents - Rotates the canvas counter-clockwise and clockwise respectively
- BACKSPACE - Flips the canvas horizontally
- CTRL + BACKSPACE - Flips the canvas vertically.
Huh? What's this? A blank screen and, whoah, my mouse works! Yup, this area is one of the few places where you'll get mouse support in the OHRRPGCE. This massive blank screen is not just a blank screen, it's actually your entire tileset. It's blank, because we have yet to draw anything. Before we get drawing though, let's have a look at just what a tile is.
Drawing tiles
The tile editor
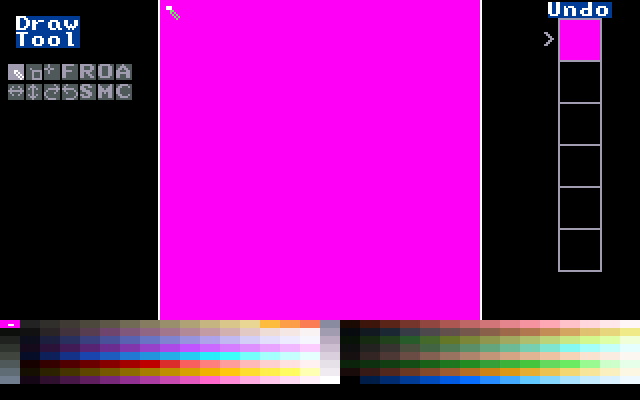
Let's get to drawing some tiles then, shall we? Use the mouse or keyboard to select the second tile. We'll leave the first alone since it's generally used as a blank, empty tile. Once you select the tile, the tile editor should pop up:
A walkthrough of the tile editor
The tile editor is broken up into four sections: the canvas, the palette, the toolbox, and your undo history.
The canvas
The aptly-named "canvas" is where you'll be drawing your tile. At the moment it's nothing but a magenta square, but soon it will be a beautiful work of art! You can "paint" on the canvas with either your mouse or your keyboard. For a full list of the tile editor's controls, check out Appendix A - Keyboard Conventions.
The palette
Underneath the canvas you have your master palette. You can use as many of these colours in whatever pattern you'd like for your tile. Click or use ALT + Arrow Keys to change your current drawing colour.
The toolbox
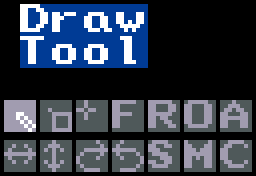
To the left of the canvas is the toolbox. The toolbox holds your, well, tools. At the time of writing there are 14 different tools:
- Draw - Your default "pencil" tool. Draws a single pixel of the currently selected colour.
- Box - Draws a filled rectangle between two points. (Note that unlike most programs where you would click and drag to make a rectangle, in the OHRRPGCE you click once at the starting corner and once at the ending corner)
- Line - Draws a straight line between two points. (Has the same controls as the box tool)
- Fill - Flood-fills an area with the selected colour.
- Replace - Replaces all pixels of a colour with the selected colour.
- Oval - Should be called "circle," because that's what it draws. Click once to centre the circle, move out to form the radius, then click again.
- Air - Similar to the "spraypaint" tool in the old versions of MS Paint. Fills a customisable area with random pixels. Good for adding texture/noise.
- Flip horizontal - Flips the tile horizontally.
- Flip vertical - Flips the tile vertically.
- Rotate clockwise - Rotates the tile clockwise.
- Rotate anticlockwise - Rotates the tile anticlockwise.
- Scroll - Moves the tile around the canvas. It the tile moves out of the canvas' boundaries, it loops around on the other side.
- Mark - Identical to the "copy" command in most image editors.
- Clone - Identical to the "paste" command in most image editors.
Use these tools together, and you will be unstoppable!
Undo history
To the right of your canvas you can see your undo/redo history. It shows the last 6 operations you preformed on the tile, and allows you to revert to any of them. You can either click them directly or use CTRL + Z to undo. You can use CTRL + Y to redo. Be careful! If you make any changes to a tile, you will not be able to redo an action. Similarly, if you leave the editor, you will lose your undo/redo history.
Passability
Passability basically shows whether or not you can walk through a tile. You can set a tile to be passable/impassible from the north, south, east, and west individually. For example, a wall would most likely by impassible in all directions, a floor would be passable in all directions, and a fence might only be impassible to the south.
Exit back out to the main menu of the maptile editor and choose "Set Default Passability."
Select the tile and set all of the "Impassible" options on. There should be a flashing box around the tile.
Each side of that box signifies that the tile is impassible from a specific direction.
You can also set a tile to be impassable by pressing CTRL and a relevant arrow key while the tile is highlighted.


