Map Construction
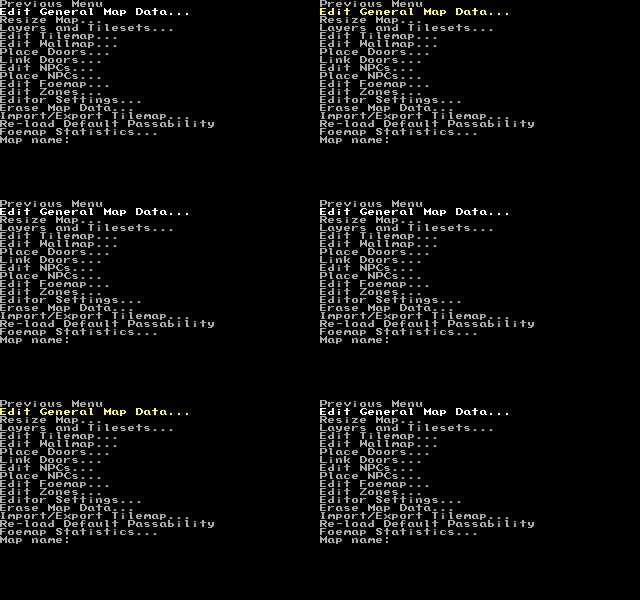
Main Menu > Edit Maps
Build a map by using the map editor to lay tilesets, add and link doors, mark movement boundaries with wallmap/passability, place objects and event triggers onto the map using NPCs and start random battles with a foemap. If using plotscripts, you can select areas of your map for attributing special effects using Zones.
Map Resize Tool[edit]
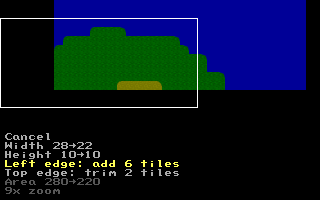
Map resizing can be done safely at any stage and will not break any other aspect of the map such as NPC placement or passability.
The smallest allowed map is 16x10, the same size as the screen, and largest map size is limited to 100,000 tiles.
Holding Shift is the default key to speed up movement throughout the OHR, you can use this here to add/remove tiles quicker.
Map Editor[edit]
The Map Editor has six modes, which can be accessed directly from the menu or jumped between while in the Map Editor by pressing F2 through to F7:
Tilemap/Picture Mode (F2)[edit]
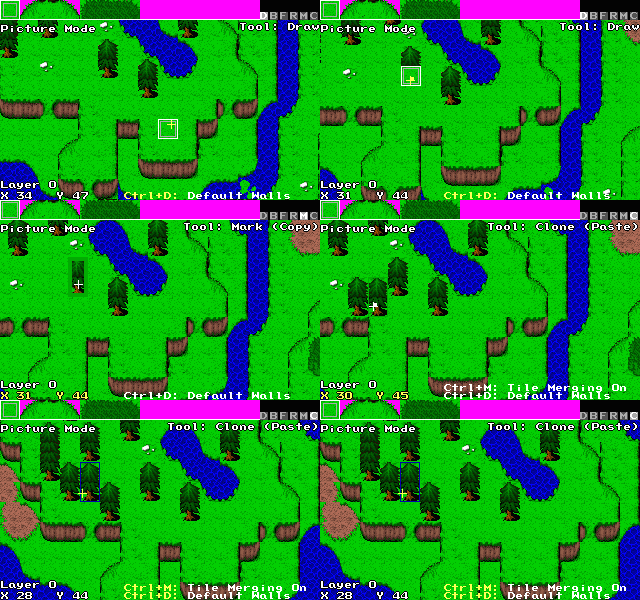
The first map editing mode is called Edit TileMap (also known as 'Picture Mode'), for placing tiles from the Graphics Editor's Tilesets.
While in Tilemap mode you should see the tiles from the chosen tileset along the top of the screen. Period and comma (< >) or the mouse wheel changes the selected tile to be placed, and ENTER lets you pick your tile full screen. ENTER again returns to the map. Or you can use G to grab the tile under the cursor as the current tile to place.
Notice also that some of the same Drawing Tools used by the Graphics Editor for individual sprites are usable inside the Map Editor for whole tiles.
Draw, Box, Fill, Replace, Mark/Copy & Clone/Paste tool.
Useful for filling large areas with one click rather than laying each separate tile.
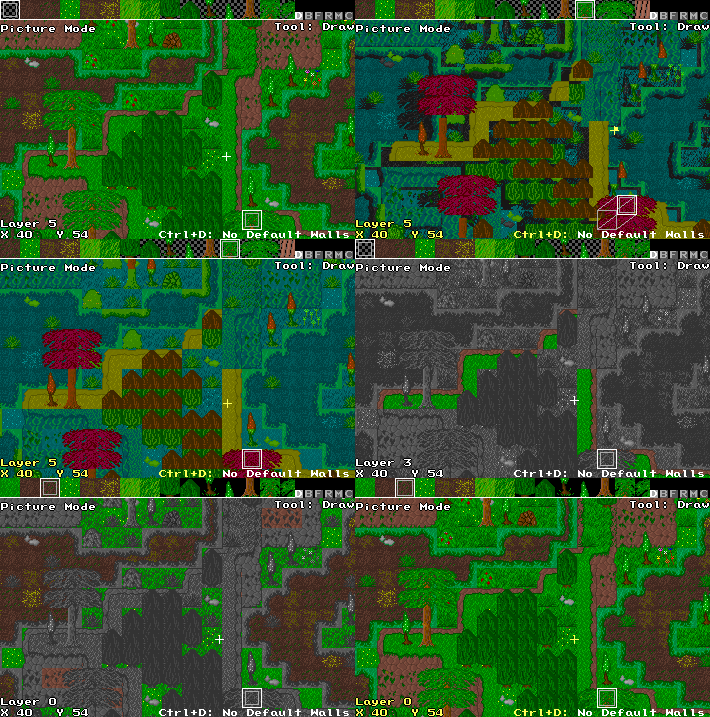
If you are using more than one tilemap layer to draw your map, use PgUp and PgDown to change which layer you are working on. Place tiles on additional layers as normal.
Working across several overlapping layers gets tricky, here are several controls to help you see what you're doing:
You can shortcut back to the layers menu from here by pressing CTRL+L, temporarily disable visibility so you can see beneath layers while working in the map editor. This is important if you plan to toggle the visibility of a layer on or off in-game (using some simple plot scripting from here).
Make the current layer jiggle about with CTRL+J. This is useful for spotting mis-layered tiles.
Layers can also be skewed by and color-tinted, as shown in the demo.
Navigating large maps while editing can become troublesome, at which point you would want to employ some useful keyboard controls:
Press ~ to see a tiny version of your map. Press TAB to turn on and off a box that will show you what portion of the map you are looking at.
Wallmap/Passability (F3)[edit]
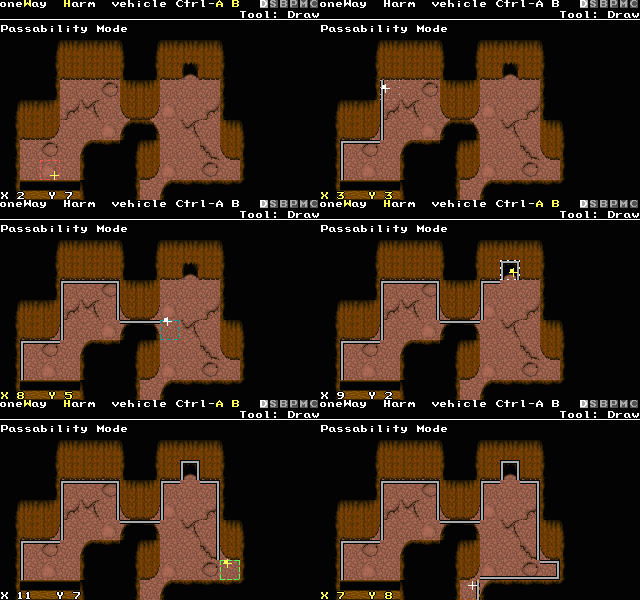
Press F3 to switch to Passability mode, or pick Edit WallMap from the Map menu.
The Wallmap will already have any presets from the tile's default passability, defined in the Graphics Editor.
Here you can make fine-tuned adjustments, for situations such as hidden passages where wall tiles need to break their usual passability rule. Maps, for now, have only a single wallmap that serves all layers.
If you want to draw tiles without their default passability effecting the new wallmap, use CTRL+D to toggle on or off whether default tile passability is copied. This is also used for the clone/stamp graphical tool in map editor, used to copy-paste tile groups with or without overwriting wall information.
All the controls for placing walls are the same as in the Tileset Editor.
Press H to mark a tile as a harm-tile. Harm-tiles can be made to inflict damage on your hero when you step on them.
Press 1 or 2 to make a tile animate (animating tiles explained later)
Ctrl-A B seen at the top of the screen while in Passability Mode is used for vehicles, explained later).
Doors (F4)[edit]
Doors are invisible triggers on a map that cause the Hero to relocate to a new XY position or/and to change map.
Doors and Door Links are two separate entities, first place doors (entrance and exit point) on the map in Door Mode with F4 and then create and specify links with the door linking tool.
For the player to see the door, you could use maptiles for static doors or NPCs for graphics that can change during game play.
Each link defines movement in one direction, two links are needed for a return journey. You can have multiple door links leading from the same door as well as multiple links to the same door.
Door links can be conditional so that they are only usable depending on one or two tags. This allows you to make doors that lead to different places or which are locked/unlocked when a certain condition is met. A main reason you'll want to do so is to switch to an alternative version of a map; Using separate maps is usually much easier than attempting to make lots of modifications to the one map. (For an extended article on conditional door links see here or read What are Tags for?)
NPCs (F5)[edit]
Unlike Doors which are placed and then edited, NPCs need to be created in Edit NPCs before they can be placed on the map.
The full NPCs chapter is next, or jump ahead already here.
Foemap (F6)[edit]
Each map has a foe map used to trigger random battles as player walks around the map.
Foemaps are shown as a number over the tile, indicating the battle formation set ID# which defines a set of battles and the trigger frequency. Learn about foemaps and the battle system by reading the Battles article.
Zones (F7)[edit]
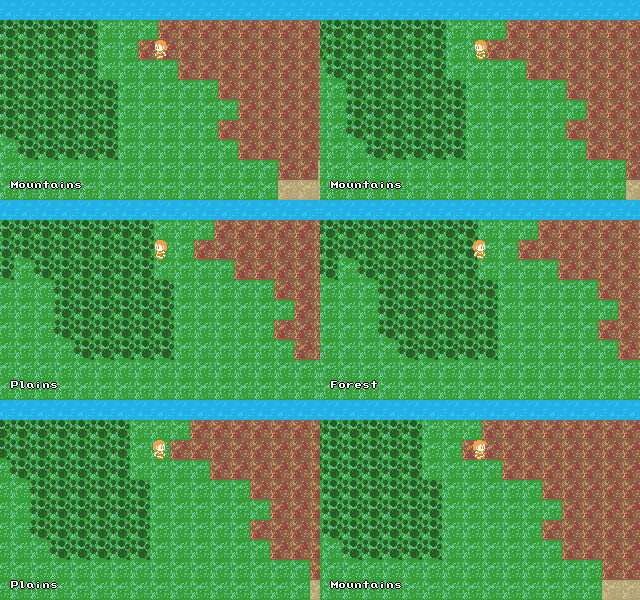
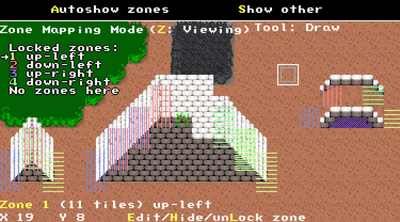
A zone simply (invisibly) marks part of the map; think of it like a map layer with two states per tile: included in the zone, or not..
No more than 15 zones may overlap at any tile on the map and there are 9999 zones per map.
The collection of all a map's zones is sometimes called the zonemap.
Zones aren't really "created"; all maps have 9999 zones, which start out blank.
Just putting a tile in a zone has no effect. You have to use the zone elsewhere. Currently, the only built-in use for zones is for restricting NPC movement (NPC "Avoidance Zone" and "Movement Zone" settings). See How do I make a wall that NPCs can't pass, but heroes can?
Zones also tend to get used a lot in scripts, any time when you want to check whether the hero or an NPC is at certain locations of the map.
You check whether a tile is part of a zone with read zone or zone at spot.
For example, to cause different walking sounds or speeds depending on terrain, changing palettes when in a shadow, changing walkabout graphics when standing in a swamp, and a zillion other uses.
The metadata that you can define for each zone, the zone name and extra data, is only used by scripts.
To define a zone, go to the Zone editing mode of the map editor, type in a zone ID number or press < and > to select a zone, press Z if necessary to switch from "Viewing" to "Editing" mode, and start adding/removing tiles to the zone by pressing SPACE.
To read more about NPC movement in zones, jump ahead to the NPCs article here.
Layers and Tilesets[edit]
Maps are initially rendered with two layers. The Hero and NPCs (all objects on the map) are placed together on one layer, and beneath this is Layer 0 for the tilemap.
While it is unnecessary, up to fifteen additional tilemap layers can be used. Each individual layer uses tiles from one tileset; and so with 16 layers and tilesets, upto 2560 unique tiles can be used on a single map.
Additional layers must first be added and/or enable in Layers and Tilesets... and here can be arranged either above or below the Hero&NPC layer (for more detail on the order things are drawn in game, see Layers). "Invisible" layers are NOT drawn in-game (or while editing). Enter on a layer to toggle "disabled" so it can't be edited, and isn't drawn while editing the map, BUT it does appear in-game.
Tiles in the 2nd and higher layers can be transparent on a pixel-by-pixel basis.
Don't forget! Color 0 located in the top left corner is the color used for transparency when used on transparent layers, and the tile in the top left of a tileset is ignored and becomes transparent when used on layers above 0. If you are using the default OHR palette, it will appear as black in the Maptiles Editor. Make sure to use a different black (there are several in the default Master Palette) if you want to use black as a color.
(The visibility, and transparency of a layer can be toggled with simple script commands. Light effects that tint areas of the map are now possible.)
Using layers well can minimize the work you need to exert on your tiles. Because you can overlay many different partially transparent elements onto the same tile.
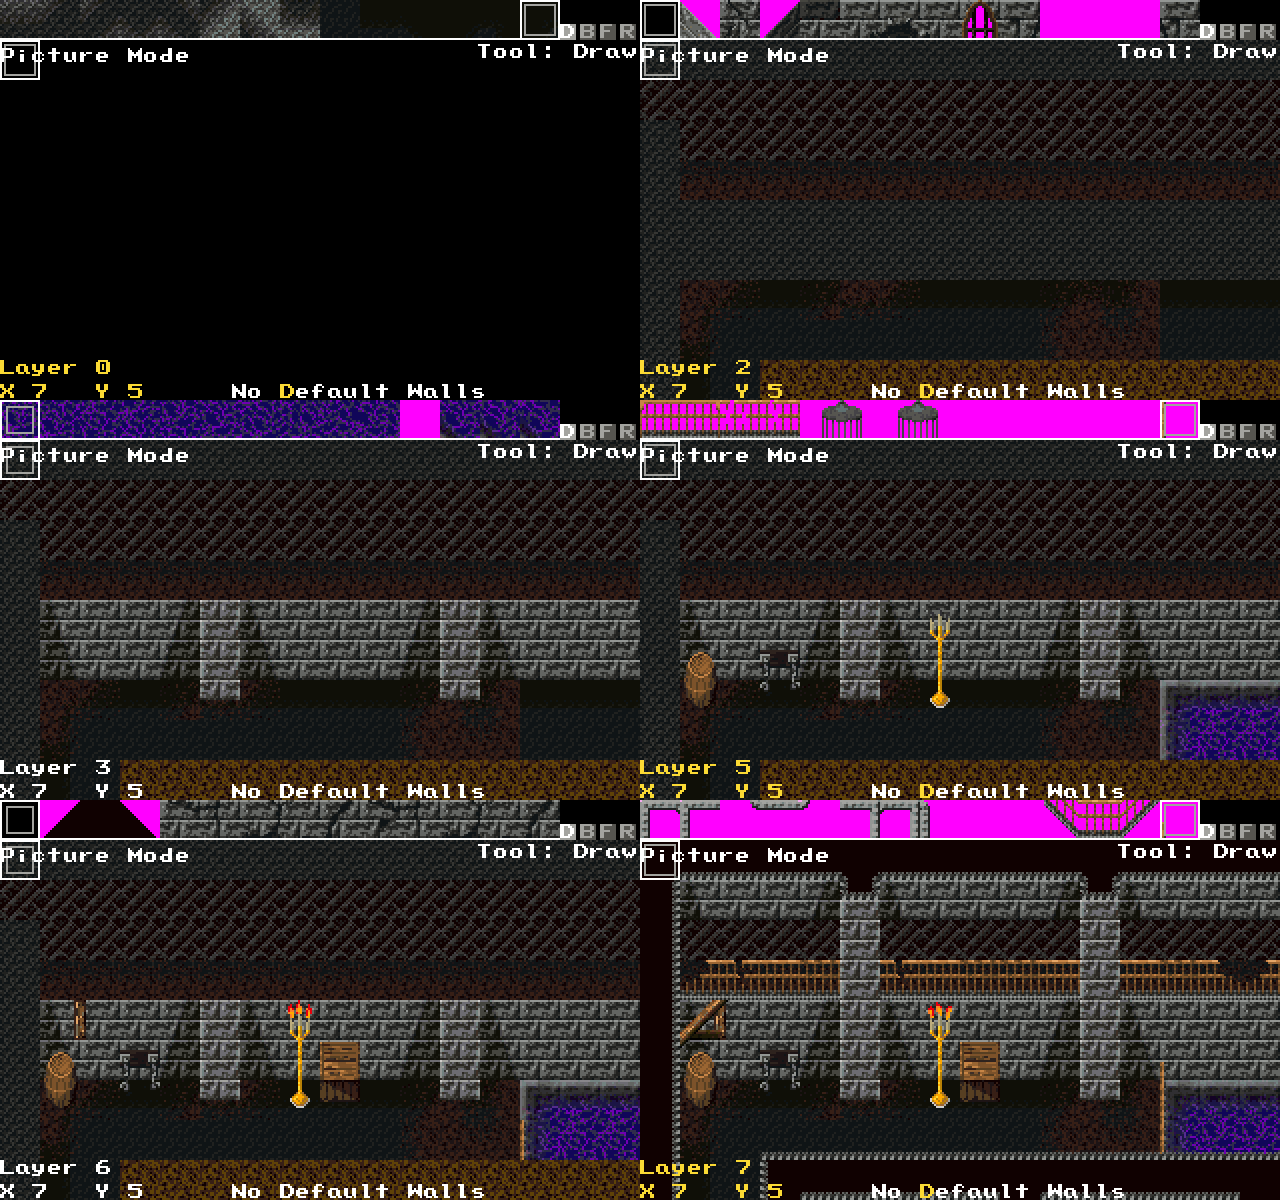
While the use of eight layers in the example above is excessive, it's a great demonstration of what's possible. If tilesets are organized drawing will be efficient and even complex maps can remain easy to handle. With the use of layers diversity and interest can be kept across very large maps that would otherwise be restricted to one tileset.
Take the following for example:
Reusing the same foregrounds for various background tiles, here a rock across multiple types of floor, greatly reduce the number of tiles needed to create variety.
Note:Versions older than ubersetzung did not support map layers at all.
Layers has replaced and made Overhead Tiles obsolete, yet the function is still available. However mixing it with layers is confusing, so is not recommended. Overhead tiles will be drawn over sprites (and all tiles on higher layers!) instead of under them. Press O to make a tile overhead.
General Map Data[edit]
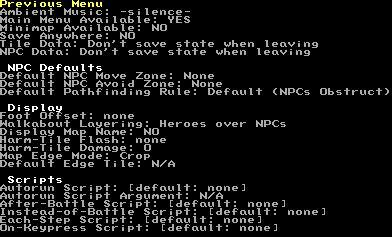
Map Name:
This name will show up on the Map Editor screen, so that you don't have to remember map numbers, and can optionally be displayed each time the player enters the map, set in General Map Data:. When choosing to display map name, set how long it appears onscreen using TICKS. One second is roughly 18 ticks. 9-18 ticks is a general good length of time to display a map name. It should be used with moderation as it becomes wearisome to see names displayed repetitively for maps exited and re-entered frequently.
Here we can also enable some key features of the map :
Foot Offset, to draw NPCs and heroes not strictly aligned with the tile grid. By changing this to the middle of a tile rather than the bottom edge, the player sprite can appear in front of and overlap an impassable wall tile rather than stop at its edge, which influences perspective.
How the game acts when at the edge of the map is defined in Map Edge Mode'.Wrap seamlessly loops the player to the other side of the map, Crop places a wall to stop the player and will hold the camera to hide the edge, default edge tile will allow the camera to continue moving passed the edge, beyond which the map will be filled in with the map's default maptile.
From this menu, scripts can be added to various parts of the map. Scripts are written in an external document and imported into the OHR. See the plotscripting tutorial for instructions on this. Use scripts to add non-built-in customization to your game, by either copy-pasting pre-written scripts or learning to write your own.
See Also[edit]
- How do I hide or show a map layer?
- How do I get more control over the display of map names?
- Scripts:Activate doors with a use key
- Show region name when stepping in part of the map (on a zone)
Getting Started | Making Maptiles | Making Walkabout Graphics | Importing Graphics | Map Construction | NPCs | Text Boxes | Tags | Making a Hero | Items | Shops | Customizing Menus | Battles | Stun, Regen, Poison, and Mute | Sound Effects | Animating Maptiles | Zones | Vehicles | Distributing a Game
Bosses | Making Complex Attacks | Combat Dialogues | Enemies that respond to a certain attack | Ways to refer to a hero in a script | Creating Dungeons | Conditional Door Links | Permanent Stat-Boosters | Creating Cutscenes | Using the Mouse in the Game | Making Android games


