Creating Dungeons
Introduction[edit]
The term "dungeon" generally refers to an area in your game with a high density of monsters, puzzles, and treasure. A dungeon confines the player to a challenging set of maps, and rewards her at the end. With few exceptions, a dungeon needs to be completed only once. As a developer, then, you must take great care in constructing dungeons that are both interesting and challenging.
In this article, we will guide you through the process of making a simple dungeon. You should have some basic knowledge of how to get things done with the OHRRPGCE.
Getting Started (Themes)[edit]
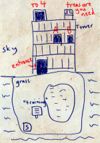
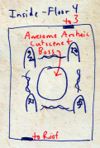
When creating dungeons, avoid the "floor-at-a-time" approach, where you simply make one cool map and then add a staircase to the next floor. This gets boring, and there'll be no continuity within your dungeon. Try to think of a unifying theme. For our sample dungeon, the idea that popped into my head was "a tower with a balcony & some technology." Which brings us to our next point: always, always do a simple sketch (on paper) of your dungeon before you begin. It'll help keep things in proportion. Here's my sketches; click to enlarge:
Enough talking! Open up CUSTOM & let's begin creating this masterpiece!
Outside Map[edit]
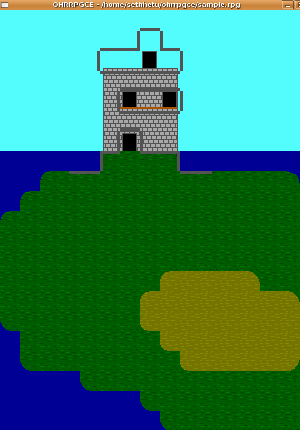
Go ahead and make the outside map, which looks surprisingly like SAMPLE.RPG. (In fact, I used this as a starting point.) Add a "sign" graphic, and link it to a text box that reads "Train for Battle in the Sand." Add the tower, and build the wallmap like so to restrict our player to realistic movement on the tower. Now, make a new map called "Sky Tower" which is taller than it is wide. We will put all four interior floors on this map. But first, don't we need some monsters?
Monsters & Floor 1[edit]
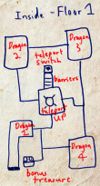
Dungeons should have monsters, and these should all fit the theme of the dungeon. If you had a water dungeon, monsters might include balls of water, ice statues, and the like. Our dungeon will have some general encounters, but the first floor will be unique in that it will hold four mini-bosses, as well. Create the map according to our initial design. Sky Dragon 1 will ambush the party soon after they enter. After encountering him, they will find a teleporter, but the power is off. Four barriers block the way to the power switch; one of these is off. Three more sky dragons must be defeated to allow access to the switch.
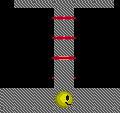 (More pictures of the floor's main elements.)
Draw all this, and add it to your map. Note that for the Sky Dragon areas, I used a different tile graphic. When the OHRRPGCE supports layers, we can turn these areas into raised "grids" so as to make them even cooler looking. To make the teleporter animate when on, I used a switch (6 = "Teleport Active") and Tile Animations for set 1 "Disable if Tag #6 = OFF." I used the same setting on Tile Animation 0 for the switch, and had the animation pattern for this set to: Right 1 Wait 1 End of Animation
The lasers blocking your path are just 3 NPCs with "Appear if TAG #X = OFF", with X being a tag for each Sky Dragon.
Now that your map has been prepared, add your sky dragons. Open up the Enemy Stats page and...
Make the Enemy. Make it say something when you approach it. Make that text box's second conditional (set Tag #X=ON), and make it fight the formation with the Sky Dragon. If you beat it, the barrier will disappear.
Treasures[edit]
Dungeons should have treasures, especially after you beat the boss or reach the end of the dungeon. You could put potions throughout out the dungeon to help the player, or just have one large treasure at the end. You could even make special paths with more challenging monsters and put treasures throughout that path. You'll notice that the path between Sky Dragons 1 and 4 (on our blueprint) has a section which appears to lead nowhere. We'll add some difficult encounters along that path, and a treasure at the end. You'll also notice that the tower's roof has space for a treasure.
(More needed: formation sets, treasures, etc.)
Floors 2 & 3[edit]
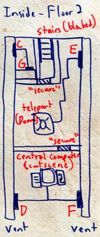
Floor 2 introduces the concept of a "permanently locked door", and re-establishes air vents as the means of gaining access to any area. But first, we need to actually make our teleporter work! Open the map editor, and choose "place doors." Put door 0 in the top-left corner (just leave it there) and door 1 in the center of the teleporter. Put door 2 somewhere below floor 1. Link them to each other, and set door 1's "REQUIRE TAG #6 = ON." Now, let's go a step further. Put an NPC on top of door 1, with no walkabout graphic. Have it display text box #3, and set it to "Activated: Step On" and "Appear if: TAG #6 is OFF." Now, have text box 3 explain that the power is off.
Save your game (you should be constantly saving it, as CUSTOM can't undo every action) and try it out! So far so good; now let's make floors 2 & 3!
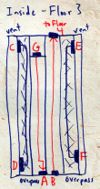
Make a door from the teleporter to the second floor. Make the second floor. Add all the elements, and that is about it, unless you want to add something spiffy, and make it connect to floor 3. Floor 3 is a maze, so make a few staircases in the second floor. If you go up that, you are in the wrong place. These features are important for dungeons. Make a connection between floor 3 and 4. Make a boss NPC and a text box it will say. Make it so the text box will make you fight the boss formation. Make the boss drop the treasure. Now, you can make a plotscript showing the boss dying, or something like that. Transport the characters out of the dungeon. You are now done your dungeon!
Getting Started | Making Maptiles | Making Walkabout Graphics | Importing Graphics | Map Construction | NPCs | Text Boxes | Tags | Making a Hero | Items | Shops | Customizing Menus | Battles | Stun, Regen, Poison, and Mute | Sound Effects | Animating Maptiles | Zones | Vehicles | Distributing a Game
Bosses | Making Complex Attacks | Combat Dialogues | Enemies that respond to a certain attack | Ways to refer to a hero in a script | Creating Dungeons | Conditional Door Links | Permanent Stat-Boosters | Creating Cutscenes | Using the Mouse in the Game | Making Android games
